Friday 28 November 2008

Ong bak 2!!

Tony Jaa Pranom for New Year present! wheeeeeeeeeeeeeeeeeeeeee!!!

Go watch the trailer NOW!

From the trailer, I see that Tony Jaa is going for a mixed martial art combo thingy plus his usual Muay Thai/Boran style this time. Something like a boy who learned from the best gurus from all over Asia. Also I see a "Pesilat" (Malay Silat fighter). GREAT!

CAN'T WAIT TO SEE IT IN JANUARY!!!

Ong Bak 2
The story is about a man with two sides - good and evil. Conceited about his talents, he lives in a world of darkness until he discovers the beauty of khon, (Thai masked dance), and transforms it into a gracious fighting skill. Hence the adventure begans as the young Thai boxer learns the skills and inner meaning of martial arts

(Source: RAM Entertainment Sdn. Bhd.)

Release Date 15 January 2009
Language Thai
Classification N/A
Running Time N/A
Director Tony Jaa
Cast Tony Jaa.

Thursday 27 November 2008

Kelantan revisited

It has been ages since i last visited Kelantan. Almost forgot how it was. Well, nothing much changed since 10-12 years back. Nothing drastic anyway. Went there for the Muay Thai event. Also this was my first time traveling solo. It was fun. I took Firefly's twin propeller plane - which is a fascinating ride of its own. "Air Turbulence" paint a new picture in my mind (and tummy).

Anyways....

Here are a few things that I got reminded again, and new things I learned in Kelantan:
1 - Chinese here speaks perfect Kelantanese. It felt weird calling a Chinese "Abe"

2 - The food is ALWAYS sweet. My first lunch in Kelantan was a hot & spicy looking Ayam (chicken) Chili Tomato. So I poured a healthy dose of the gravy. I end up eating the fringe of my unsoiled rice. it was worst than a Ayam Madu (honeyed chicken).

3 - Drivers here thinks they drive a tank instead of car. Signal light? Who cares. No parking/stopping/waiting/U-turn? no such words exist.

4 - Mamak here is best thought of as spiced up kedai makan kelantan (kelantan restaurant). Just to prepare yourself from disappointment after ordering teh tarik & roti canai. Atleast at the riverside one.

5 - Marlboro is the hardest to find.

6 - Gocoh means fight. Luckily I was with a group of Muay Thai fighters :D

7 - Tanner means Trainer. In a cool way I like how it was pronounced by the Thais - especially by Mat Amin

8 - Earrings worn by male are frowned at. First I thought I was stared at for my charm o_O

9 - You can still find rare antiques still in use (see pic)

10 - Worst of all for a nocturnist like me, 11pm is the maximum time to witness any 'life' on the street.

yeaaah! I used to 'gayut' on this orange thing

Anyhow, these 10 things might sound like a pouty complaints but in truth I was enjoying these Kelantan quirkiness. It was memorable & appreciated nonetheless. It made me smile writing this down :)

Oji's Personal Muay Thai - pt.2

After a number of body conditioning Muay Thai session at home, now I'm having better stamina & endurance. I feel it is about time for me to register with a gym. And guess what, Boxxwarriors Gym open one up in Ampang Point area (same row as Hometown Yong Tau Foo, overlooking Ampang Puteri Hospital). SOO convenient for me! yeah!

PS: for those interested, this is a pure Muay Thai gym, not some kickboxing or Mixed Martial Arts (MMA) body-combat stuff. So get yer Muay Thai boxer-shorts ready!


"This is the place where love is broken down..."
("Shine" by Field of the Nephilim)

Boxwarriors Gym Ampang
Mr. Saksit - Chief Trainer (far right)

Oji's Muay Thai Virgin No More - With Blood & Sweat!

Chaowalit waiting his opponent calmly

Mr.Jeab attending Chaowalit by the ringside

What can I say, this was my first experience with big Muay Thai event - Kelantan Nov 2008. And I was the floor crew to boot - ALL ACCESS tag dude!


The sound of heavy powerful bashings and sprinkle of sweats & blood were priceless to experience so close to the ring. My heart was racing as if I was the one fighting. Involuntary shouts, whoops and claps came freely from me. Now I can understand when Boxxtomoi aka Mus said "you'll get hooked once you are beside the ring so close to the fighters".

This was also my first time meeting & mingling with the NakMuay. Before and after fights. To be able to see behind-the-scene ready-room. The preparation of oiled massages, the ritualistic donning of Mongkon. Also the proud faces of winners, and the concealed anguish of losers. But here I see no hate between them, only respect. Nor do I see big-headed pride. Just respectful, spirited, sportmanship - no not sportmen, but WARRIORS. In a sense, I see all of them as winners.

Thanks to Mus & Kawanboxx, I can now tell my grandchildren my little bloody & sweaty story LOL. BTW, The fees I paid to be a KawanBoxx was really a charity. From Kawanboxx to ME! Not the other way around. Thanks once again.

Tuesday 25 November 2008

Wallpaper: Polygon Universe


Something I whipped out last nite. Simple polygonal design - my motto is always "Less Is More". Probably will create a few colour variation later on. If you like, you can use it on your own computer :)

Design for dual monitor setup with files for left & right monitor.
But each file can stand on its own for single monitor. Size is 1280 x 1024 each.

Monday 24 November 2008

on hold...

Note to self:

Quite a number of things happened lately that need some blogging, but i just couldn't find the right time to do it. A few highlights are:
- Kelantan Muay Thai Championship event - DONE
- Boxxwarriors Muay Thai Gym in Ampang Point - DONE
- Some software reviews - basically music stuff, virtual instruments
- some production blog on my 3D shortfilm

oh well, now that i've done most of my job i can start blogging again. Maybe tonite.

Friday 14 November 2008

Journey Into 3D #5

Recently a friend ask me about 3D softwares and I can see the disbelief when I said it cost around RM12,000 more or less for pro-grade application like 3ds Max. Ofcourse there are other cheaper alternative like Cinema4D (RM3500) which is quite good really. But there are also FREE software! No I don't mean pirated/cracked apps. Here I list two of the most reviewed 3D apps which is surprisingly good!

1) Blender
This app is the most talked about in the free 3D community. The feature set is almost like a full-blown pro-apps. And it is even competitive with some commercial apps too! You can't go wrong with this one if you want to start 3D. And you can't beat the price - it's FREE.


nice user interface!


Photorealism is not exclusive to pro-apps anymore!


I love frogs and this image is awesomely artistic too

See the full Feature & Gallery

A good place to start learning Blender:
Blender.org Tutorials
Blender.org Video Tutorials
Blender.org Help, Manual, and Support Forum
There are numerous other FREE resources & tutorials for Blender on the net. Just Google "Blender Tutorials".


The other free 3D software worth mentioning is...

2) Wings3D
I haven't really played with Wings3D and I don't really bother with it since in my opinion Blender has more features and support. But I've met a few who swears by Wings3D power. So, just visit the website, download & install, and see for yourself.

Wings3D Gallery
For Tutorials, as usual, use Google.

===============================================================
Note
In all things artistic, its not the tools that is important - it is the artist. But a good tools do helps a lot in any case. Speaking of help, another important factor is the availability of resources: Tutorials, Forums, Support, etc. This is really important and I can't stress it enough. You'll understand once you start 3D :)

Saturday 8 November 2008

Kawanboxx Mamak session (kecil2-an)

Lepak & borak on muay thai from 4pm-8pm.
Posted from mobile blog.


Mr. Boxxtomoi

Mr. Fick

Tuesday 4 November 2008

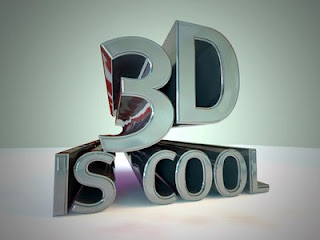
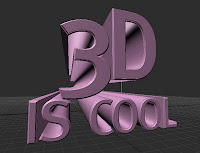
3D Tutorials #1 - 3D Text

Today I've decided to do a tutorial instead. I'll start with simple basic tutorials for beginners. Requests are open for more advanced tute. I'll be using Autodesk 3ds Max 2009 as reference so some terms or workflow might not apply to your choice of 3D apps.

Create your own cool 3D text

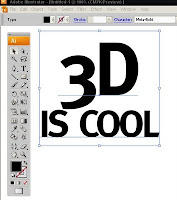
Most 3D apps have text primitives or built-in text shape generator. This is the most straight-forward method. Or you can also import your text outline you've created in Illustrator or similar. BTW, this tut can be applied to other shapes as well, like a logo. In this tut I will use this import-method.


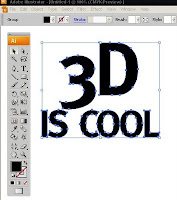
Preparing the vector shape from Illustrator or similar
After creating your text in Illustrator, you need to convert it into *vector shapes or outline. You can do this by Ctrl+Shift+O or Menu>Type>Create Outline. Now save a version that your 3D apps can import. 3ds max can except AI (Illustrator) files directly but it need to be saved in AI v8 format. Most other 3D apps can accept Autocad drawing format: DWG or DXF which you use Export from Illustrator.


* Vector Primer

Vector means mathematically created shapes or graphic as opposed to Raster which is pixel-based thingy like photos (digital or scanned). A vector shape retains the info for the path coordination making it a cool format for import/export between applications.


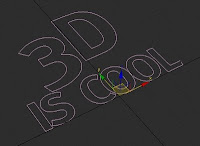
Importing the shape into 3D apps
This is pretty straightforward for 3ds max. I just drag n drop the AI file onto Max. You can also use Import. Now you'll see your text as spline shapes. You need to attach all the shapes to be a single shape. Rename it to something cool. It is good habit to rename everything in 3D. Seriously. Now is also a good time to rescale your text to suitable size - Illustrator's dimension is for paper-size, which is quite tiny compared to 3D app's dimension where usually people build cars or houses!

*In Max, rescaling the object won't really change the internal dimension, (which will give trouble later on) you need to rescale it up from the sub-object level.


Gimme the freakin' depth!
To give the flat shape some depth, simply apply Extrude or Bevel from the modifier panel. Voila! you got 3D text.


In my final image, I use a slightly more advance bevelling called Bevel Profile. I also add a Mentalray (renderer) chrome material plus simple lighting setup.

Hope this helps. Any questions or comments are welcome.
Have fun!

Sunday 2 November 2008

Journey Into 3D #4

Ok now that you know your modelling tools, let's get a bit deeper (and longer explanation) on Polygonal modelling.


First, the Mesh
A mesh is a general term used to describe piece of geometry in 3D. It is made of many polygons and other sub-objects.

[all images] the red part are selected sub-objects. click for large view


The mighty Polygon
This is the basic piece of element to form a shape. It is also call a 'face' on a mesh. Most basic polygon is 3-sided - a triangular or 'tri' in short 3D jargon. Usually a quad (4-sided) mesh is used most of the time. A polygon is always one-sided. Meaning it only have surface on one side and it is zero-thickness. So to form a sheet of thin mat for instance, you need to create the side polygon as well. Though most of the time you don't really need thickness.


Vertex or Vertices (plural)
In a polygon mesh, you got vertices that made up the basic structure. Think of the join-the-dot game. To create tri-polygon you need 3 dots connected with Edges to form the triangle.


Edge
An edge is a space between 2 vertices. This is also forms Edgeloop which basically mean a continuous ring of edges (will explain later).

That was the basic component of a mesh. So, to make a box you need 6 polygons, 8 vertices, and 12 edges. Got it? OK good. Uhmm what else i want to talk about? Ahh modelling tools...

With polygonal modelling, you get to Cut, Split, Divide, Extrude, Bevel, etc. Remember when I said poly-modelling is like sculpting? I mean it. For example, to build a head, You create a basic geometry - a box or a sphere. Ohh btw, poly-modelling is also called box-modelling. Then you move/rotate/scale the sub-component. But moving alone is not enough. You need to cut or add polygons, say to make a nose. I'd use Extrude on polygons to raise a new set of faces to form the basic nose. To make the nostrils, I'd divide the single polygon, then inset the two faces to form new inner faces. I'd then extrude this new faces up to make a hole.


The start of a nose. Really.


The nose in it's polygonal glory


Subdivision added. I'm not a nose expert, but i think that nose is passable and kinda qute too :)

This process goes on and on - cutting, moving, extruding, until you ge the basic shape up. This might sound tedious but it is really fun actually! You'd spend hours if not days pushing verts (jargon for vertices). Then apply subdivision or meshsmoothing, you'd see your coarse model turn into something smooth, curvy and yummy :). This is also why poly-modelling is great for organic model which need that handcraft touch.

Until next post, have fun pushing verts!

Journey Into 3D #3

Last post I mentioned about terms & jargons used in 3D production. Here it is plus some other stuff too.

While modelling you'll come across words like Mesh, Polygon, Vertex, Edgeloop, Spline, NURBS, Patch, etc. I will try my best to tell you what it all means by breaking it down into category. But first of all, I'll tell about modelling methods available.


Polygonal & Sub-Division Modelling
This is my fav method. It is more like sculpting really. You take a block of basic shape and start shaving & adding polygons to form a more or less a complete shape. This is still blocky. Then come the Sub-Division level. Most 3D apps have a function to sub-divides your coarse polygons into smaller, more refine polygons. Some called it Meshsmooth/Turbosmooth. Some called it simply Subdivision.
Pros: Like sculpting, you can create almost anything with it. Iterative workflow meaning you could start with a stick and work up until its a sword or something. Very good for animation.
Cons: You need to have a clean mesh from the start to achieve a good final shape. I'll explain more later.


Patch Modelling
Patch modelling is like warping/wrapping/molding a thin, stretchable sheet into shapes. Take a square sheet, and pull the center edge out and you'll get a rounded edge. pull the center upward and you get a mound. Yes now you can model a pillow.
Pros: Very good for something curvy and smooth like...a pillow.
Cons: Very hard to get good sharp edges.


NURBS Modelling
It stands for Non-Uniform Rational B-Splines. Using NURBS make me feel like a scientist or something :). Anyway, it is much like Patch modelling but more mathematically intensive. NURBS (i like how it sounds...) work by taking math coordination functions like XYZ value and use tangent and stuff. Very genius-like. And very heavy on your computer.
Pros: same as Patch. More refine control and advanced toolset
Cons: same as Patch. Heavy


Spline-based Modelling
It is also called spline-cage modelling. Imagine you build a skeletal base, say a Hindenburg Zeppelin (that caught up in fire), then you apply sheets of coverings to the cage. You'll get a Zeppelin! (minus fire. that I will tell how to do later)
Pros: Tweakable, fairly accurate, almost able to build anything with a defined shapes.
Cons: The cage need to be in correct order and have corresponding 'support' cages. Organics modelling is somewhat tedious.


Next I will post more on this subject. So stay tuned *sips coffee*

Saturday 1 November 2008

Journey Into 3D

Journey Into 3D - #2
(Previously 3D Made Easy - OK still not a clever title but this will suffice for now)

3D is wonderfully, deliciously multi-faceted. You can do lots n lots of things with it. From simple things to excrutiatingly complex stuff. For instance, you can create cool logos, or an animated bouncing ball, your fanciful product design, or a walking fire-breathing dragon.

With that in mind, 3D can be dauntingly hard to grasp for first-timers since you can easily get sidetracked with it's many many application features. So, my first tips is to get to know what you want to do with 3D and try to narrow down YOUR fancy.

Here's a list of job specification a 3D artists usually falls into. This is also a workflow of a complete 3D production.

Modelling
moulding polygons n vertices to form an object or subject.

Texturing
giving that object/subject some skin or colour or material.

Lighting
just like any camera-based thingy, you need lights.

Animation
making things moves

Special FX
the 'WOW' factor of the 3D branch.

Technical/Renderings
the boring but all-important stage where all the above get it on the final image.


And here is a list of production category:
3D Film Animation
yep, most ppl wanted to get into 3D after watching Pixar's stuff.

Special FX/Visual FX
you saw them in movies and wonder whether that car crash scene was real or CGI.

Architectural Visualization
creating virtual rooms and buildings look like it have been built before any brick been laid.

Product Visualization
next time you see a new shoes ads by Nike, think again whether its real or not.

Simulation (Industrial, Medical, Infotainment, etc)
watched "Aircrash Investigation" lately?

Creative Design a.k.a Creative Content Creation
any serious designer is a fool if he/she think they don't need to learn 3D.


Next post I will try to explain some of the jargons or meaning of some 3D-centric words used by 3D artists.